
This thread is dedicated to only one thing: How to get good pics. This is such a regular question, it should be a dedicated section. I Use a Canon SX 10. It was $500.00 at Best Buy, and was a mid-range. My photos have evolved over the last month, as I adjusted to learning how to use the camera more efficiently. To use it, I put the coin on a paper towel, put the camera on Manual, call up SuperMacro, flip up the flash, and put the lens DIRECTLY on the paper towel, leaving only enough light to get in. That is what you read, it resolves exactly ON the coin. If you tilt it a smidgen, it produces a slight fuzziness as is seen on my last die clash in the Very Special Lincoln post. I am sure Photostitch would resolve this, but if I want the other half, I just tilt the camera the other eway and shoot again. Very easy to use camera.
Total time to take a pic...15 seconds. Better pics are a minute max, as the program digitizes the larger pixels.
Welcome guest, is this your first visit? Click the "Create Account" button now to join.

Results 1 to 10 of 21
Thread: Camera thread.
-
04-16-2009 #1Banned


- Join Date
- Dec 2007
- Location
- N.C.
- Posts
- 469
- Post Thanks / Like

- Rep Power
- 0
Camera thread.
-
04-16-2009 #2Banned

- Join Date
- Sep 2008
- Location
- Trapped in Ohio
- Posts
- 6,800
- Post Thanks / Like
- Rep Power
- 0
Ok..Ill try to give as much detail as I can.
1st: I have an expensive camera that doesnt work great for coins so I use a cheap 8.0 megapixel Olympus FE-280 on SuperMacro for any close up shots of the FULL COIN. Just get the lighting at an angle you prefer.
2nd: Try to keep the camera parallel with the coin. If you have a tripod or if you have (what I have) a tiny suction cup stand that screws into the camera like a tripod and it rotates any direction or angle and then you can tighten it to stay there. ALSO a cheap buy ( I think it was like $3)
If you have one, Set your camera on delay so your not anywhere near it when it snaps the pic ( Clearest)
But if you dont have one just try not to move AT ALL.
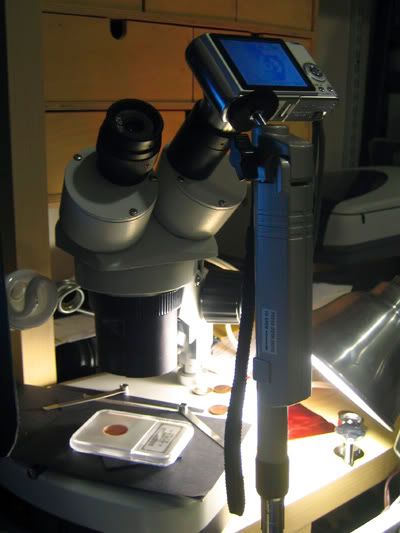
3rd: After I get the FULL pix, I use a CARSON portable scope ( seen in the picture) To get a nice closeup of the error or variety Im looking at. I put a piece of white paper over the side of the clear viewing part and shine the light thru it as a filter ( also as shown) The lens of the camera that I use fits great right up to the eye of the scope. I also keep it on Macro or Supermacro when I do this.
4th: After I take a few pic of what I want, I look thru them and keep the best or sometimes I delete them all if I want better pix. After I choose the pix I want, I open them 1 by 1 with PAINT ( program on almost every computer) .
The pictures are usually HUGE when opened up to the actual size( like in paint). So I click on IMAGE on the top of the toolbar, Click Stretch/Scew and put 50% in each space. Now your Pic is half the ORIGINAL size. Now I take the little dotted square tool and use it to CROP the image to just the area that I want. SAVE
5th. If I want to adjust lightness or darkness I open the pic ( one saved from the PAINT program) with PHOTOSHOP. With the Image section ,on the toolbar, I go to ADJUSTMENTS then LEVELS. So its Image/Adjustments/Levels. Then I can fool around with lights and darks til Im happy with the outcome.
I think thats pretty much it. Heres a sample of a few pix I just took to show. I usually always have really nice FULL pics, but when I get close like in the RPM pic. I have to take a few til Im happy. Even the pic Im posting right here isnt one that Im happy with. I can get much clearer pics of the MM if I take my time as you can see it focused more on the date rather then the MM.Last edited by kloccwork419; 04-16-2009 at 07:48 PM.
-
04-17-2009 #3Moderator, Die & Variety Expert
- Join Date
- Apr 2008
- Location
- New York
- Posts
- 15,457
- Post Thanks / Like
- Rep Power
- 3149
To effectively take pictures, it is suggested that one have a rudimentary understanding of photography.
Photography: capturing a specified amount of focused light, for a set period of time, onto a light sensitive material (the film plane.) The mechanics can be simple or complex...
Light hits a given instance, reflects off, and then travels toward a small opening on to your camera. A cone shape is created that become smaller as it directs toward you. There is a lens or an opening that helps to focus the light where it will then at a given distance flip and invert itself and spread back out into a new cone toward the film plane (a light sensor or film.) The size of the opening is called the aperture and it works with the lens to help establish the amount of light, the focus, and the depth of field. Additionally, the opening will also have a correlation with the next step, time required (or exposure), created by the release of a barrier exposing the light to a given light sensitive material (the shutter speed.)
Most modern cameras take all of these factors, along with many others, and focus the lens through triangulation. The camera automatically calculates for the user the correct aperture (f-stop); shutter speed (time); degree of light sensitivity of the sensor or film; adjustment for white balance (and the type of light encountered); and if required the amount of light and time a flash will illuminate the scene - all in a matter of micro seconds. Some cameras have image stabilization software to help counter-balance camera shake.
The user still must be aware of the limitations of the scene they intend to shoot and the equipment they are using. Cameras capture light and record it nothing else. If there is not sufficient light the camera cannot do its job. The less light available, the longer the exposure, the harder it is to hand hold during the picture taking process and or capture an object that is moving.
Depth of field is the distance between two points in your field of view where and object remains in focus. Depending upon certain variables this can be extremely small, lets say a millimeter, and infinite. It will mostly depend on the lens and the distance between the scene and the camera, but also depends on a correlation between the amount of light available that is directed through the aperture.
Film or sensor sensitivity is also a factor. Black and white film captures the greatest spectral range followed by color film, and finally slide film and digital sensors. This means the given range of hues; saturation; and lightness are limited to a set amount per picture. With digital photography, when one goes above or below the range you are working within, the camera subscribes values of 0 (black) or 255 (white) to those areas. That is one of the reasons why it is recommended to diffuse or bounce electronic flash (or other lights) as opposed to working with that bright light directly because the range can be too great for the sensor to handle.
Once you captured light onto your camera, then you enter post-production which can be simple or complex. It might be you hand the film to a photo-technician and wait an hour for prints. It could be downloading digital information onto a computer and allowing software to automatically configure everything and hope for the best. Or possibly the user may manually edit, crop, reconfigure, touch up etc. the exposed film or digital images. Experienced digital photographers in general use Photoshop to edit their pictures (version 7.0 or higher.) This software, which can be expensive, allows for almost complete control over the media. The amount of alteration can be simple like cropping and output size or more complex like advanced color correction or dealing with selections and manipulations. There is of course a finite ability to manipulate any given image and it greatly depends on the amount of information in the original image captured. Photoshop is fantastic but can be overwhelming and take years to learn. There are simpler and cheaper photo editing programs that can be perfectly sufficient.
Shooting macro-photography depends on your equipment and your knowledge of the given situation to obtain satisfactory results. The principal of macro-photography differs from other photographic situations in that the scene is either the same size or smaller than the film plane. Most older cameras were not designed to shoot objects close up and required special equipment as a result. Fortunately modern cameras (especially compact point & shoot digital cameras) have been constructed differently and have smaller sensors that essentially make the lenses appear longer and achieve a degree of magnification impossible with film. They have also been given software (a brain essentially) that helps the camera reconfigure itself to deal with these particular situations. The variables are the same though. The amount of light required, the limited depth of field (which is very shallow), pinpoint focusing, distance between the lens and the object (which can nearly be touching), the amount of time needed to capture the scene and the sensitivity of the sensor or film.
If the camera is capable of shooting an object that nearly touches the lens, then the issue of light quantity becomes a problem logistically because the camera is literally inhibiting the illumination of the scene. This can be corrected by either shooting with enough distance to allow at least some light to come through or by introducing bright light. One can use intense box lights or strobes, or maybe even the flash on the camera but the light will likely need to be diffused for a more even appearance. Another logistical concern when the camera is that close to your scene is to consider the angle you are shooting with that of the picture plane. Anything that moves away from being parallel can lead part of your intended scene to drift out of the depth of field. Many photographers use this as a device to control what they want the intended viewer to see. (Think commercial photography.) An object or person is in focus and everything else blurs out so you focus on a particular area first and notice whatever product they are offering.
It should be remembered that with digital photography the image captured can be easily resized up or down, cropped or reworked with ease. That means a larger image can be taken to allow for greater depth of field and more light, then manipulated and cropped later to the particular detail(s) wanted.
Extreme close up photography works best with the use of a monocular or binocular scope that become an intermediary between the object or scene and the camera capturing the image.
My setup:
The first two images attached were shot with a Canon PowerShot SD300 on macro mode. This is an older camera with only 4MP, the macro setting could be better and focus is tricky and irritating. Lighting was from a 250 watt soft box lamp (the light costs more than the camera.) Flash has been experimented with; using a diffuser or bounce, but a stable light source has been the best thus far. Shots have been either hand held or with one of many tripods lying around the studio.
The close-up shots were taken with a Leica c-lux camera attached to a mono-pod and pressed up to one lens of a binocular scope with a large viewing area on either a 20X, 30X, 40X or 60X setting and subsequently manipulated with Photoshop CS3. The Leica works best with one set of scope lens (10x wide field) while the Canon works best with the other a (20x.) Lighting was a balance between a variable halogen on the scope and a mini-fluorescent light that rotated around the scope and is typically hand held to illuminate key details. The lights are already diffused (to a degree) and are low power and have not needed to be diffused any further. The primary post-production manipulations done were: color correction (making global RGB curve adjustments both contrast and hue); cropping and resizing; and some touch ups using various tools.
In some instances, glare from a slab, the bottom of the scope or a flip has bounced back up to the scope. This has been alleviated by using black paper around the base of the scope's viewing area and covering anything white or reflective while viewing or photographing.
Hopefully this information can be used a spring board for a better understanding of photography and macro-photography. It was written by an artist and photographer who has been serious about photography for about five years, used Photoshop for ten years and started shooting coins a few months ago.
Jason Cuvelier
-------------------------------------------------------------------------
1983 1DR-001:

2001 1DO-001 EDS:

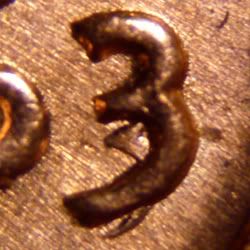
1963D 1DO-001 EDS (detail of doubled 3):
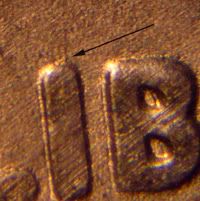
2001 1DO-001 EDS (die marker - scratch):
2004 CDDO-006 (die gouge):

Scope:
Last edited by jcuve; 04-17-2009 at 12:46 AM. Reason: spelling
Jason Cuvelier
MadDieClashes.com - ErrorVariety.com
TrailDies.com - Error-ref.com - Port.Cuvelier.org
CONECA
(images © Jason Cuvelier 2008-18)___________________
-
04-17-2009 #4Banned
- Join Date
- Dec 2007
- Location
- N.C.
- Posts
- 469
- Post Thanks / Like
- Rep Power
- 0
Now THAT'S WHAT I'M TALKING ABOUT!!!
Jcuve thanks so much, as yours is exactly the type of post I envisioned when I conceptualized having this dedicated thread. After about 13 or so replies like yours, this will be the go-to place for coin photographers across the nation, and not just Lincoln collectors. Kudos for your knowledge and expertise sharing!

-
04-17-2009 #5Moderator, Die & Variety Expert
- Join Date
- Apr 2008
- Location
- New York
- Posts
- 15,457
- Post Thanks / Like
- Rep Power
- 3149
Im glad you approve and hope it helps! Originally Posted by legend

BTW: It was late and I forgot to mention a few other important points.
The shutter speed obviously determines the speed that the shutter stays open during exposure. (If your camera tells you) speeds below (approximately) 1/30 of a second become difficult to hand hold without obtaining a blurry image. A tripod or monopod is suggested.
The lens opening is called the aperture and its various sized openings that allows light to come through are called (f-stops.) The general rule is that the higher the number (like f22), the smaller the opening, which means less light, an increased the depth of field but requires a longer exposure. Inversely, the lower the number (like 2.8), the larger the opening, which creates a diminished depth of field, allows more light and faster exposures. Point & shoot digitals (sometimes) allow for control of the aperture and shutter speeds. Images with shallow depth of field for effect were shot wide open as are action shots of athletes caught in motion. If you can shoot a coin at a higher f-stop, with a timer and a tripod, this can give you a little extra depth of field.
ISO numbers, if changeable on your camera, mimic film ISO (formerly called ASA) numbers. The higher the number (like 1600) the more light sensitive the sensor becomes but come at a cost of increased contrast and loss of detail through pixelation. Lower numbers oppositely (like 100) are less light sensitive and have no negative impact on image clarity.
And last but not least, experiment and have fun!
Jason Cuvelier
MadDieClashes.com - ErrorVariety.com
TrailDies.com - Error-ref.com - Port.Cuvelier.org
CONECA
(images © Jason Cuvelier 2008-18)___________________
-
04-17-2009 #6fugnchillGuest
My High Tech Photography set-up
I thought I would share my set-up for taking pictures of coins.
First off: I have a Sony Cyber-shot DSC-F505 digital camera that I purchased used off Ebay close to 10 yrs. ago. It only has 2.1 megapixel with 10X digital zoom. (I just checked ebay and there is one with a buy it now of $44 but the flash does not work). I use this for full coin shots.
Second: I use an Intel Play QX3 toy microscope for close-ups ($30 ebay)
Now the Set-up: A black cloth, black jewelry box, lens from magnafier and a little metal stand. Oh, a napkin as a filter if needed. I had this stuff lying around the house so not much cost.
I can move the lens at any angle and distance from the coin and move the coin and box to any angle needed. I don't have any secondary lighting, just the natural light coming through the window. I'll drape a napkin over the set-up to filter the light. I always use the macro setting and only adjust the aperature setting up if I'm trying to capture toning.
So for $100 - $150, that's what I use.
Here's the pics with some examples:
Lestrrr
-
04-20-2009 #7Registered User
- Join Date
- Sep 2008
- Location
- Northern California
- Posts
- 5,696
- Post Thanks / Like
- Rep Power
- 315
Microscope setup
This is my QX5 microscope with the lighting I use.
The upper light on this scope causes too much glare so I have blackened out the light and use my Ott-lite with the adjustable arm and tilt capability. However, the scope light still has a usefulness.
Notice on the computer screen the control panel on the right side of the screen. There is a slide adjustment for the scope light. Occasionally I use the scope light to help balance the brightness of the Ott-lite image. I increase the light in stages until it balances the color of the coin on the screen. This actually helps to remove glare and brightness which can make the devices on the coin difficult to see.
The remainder of my photography is done with my Canon PowerShot SD850 IS Digital Elph 8.0 megapixels, 4x optical zoom, with image stabilizer, in macro mode with no flash.
For the most part I place the Lincoln in a dime flip which holds the coin firmly when I am moving the flip at different angles to obtain the best picture I can shoot while hand holding my camera. I also use a dime flip to hold the Lincoln cent when I place the coin under the microscope. This makes it much easier to move the coin and turn it to shoot different sections of the coin.
(Oh, the banana you see on the desk is actually a catnip toy for my 'Squirrel the Cat')
Thanks for 'listening',
JeanLast edited by JeanK; 06-23-2009 at 11:52 AM.
-
04-27-2009 #8Banned
- Join Date
- Dec 2007
- Location
- N.C.
- Posts
- 469
- Post Thanks / Like
- Rep Power
- 0
Jean that's kewl!
I also imagine a black light poster somewhere in your room, too! That's a cool getup!
-
04-27-2009 #9Member
- Join Date
- Jan 2008
- Posts
- 1,232
- Post Thanks / Like
- Rep Power
- 52
a nice Thread here..
and , yes nice setup.Lincoln Cent Variety Enthusiast
-
04-28-2009 #10JonathanGuestHey that's exactly what i do! I have a Canon S3 12 optical zoom. I put my penny on a white peice of paper so the coin is bold compared to it's surroundings and then turn on super macro. I also use a flash, and seeing as you get so close with super macro that the camera lens is almost touching the penny, then no light can enter. Thanks, Jonathan Originally Posted by legend

 Reply With Quote


Bookmarks